
Back in 2005 I wrote a tutorial that explained how to use Asterisk PBX as a voicemail system for a Cisco Callmanager 3.3(5) environment.
The tutorial was quite popular, but went offline when I forgot to renew the domain it was hosted on.
I have recreated the tutorial below.
Note: You will need a bidirectional calling link between Asterisk and Callmanager, which is beyond the scope of this tutorial. This tutorial uses asterisk-oh323.
Note #2: If you are using CCM 4.0 or higher, it is recommended that you use a SIP trunk. This tutorial was originally written before 4.0 existed and as such only covers H323. You can view the SIP tutorial here.
Before starting, you will need to make note of several variables:
- VoicemailMain extension (this tutorial uses 8888)
- VoicemailMain extension that goes direct to the mailbox of the calling phone (this tutorial uses 8889)
- Prefix for turning MWI on. This tutorial uses 281EXTEN
- Prefix for turning MWI off. This tutorial uses 280EXTEN
- A direct to voicemail extension, eg: 27000 will go to voicemail for extension 7000.
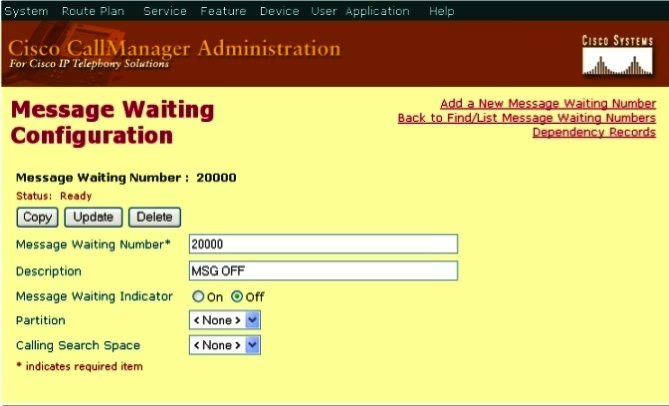
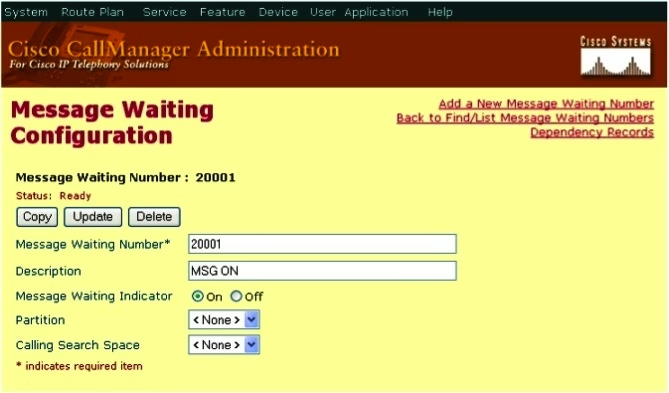
- CCM code for MWI on. This tutorial uses 20001.
- CCM code for MWI off. This tutorial uses 20000.
- Voicemail context. This tutorial uses the default.
CCM Configuration
Let’s begin. First you need to login to CCMAdmin.
Once in, go to Device > Gateway and add an H323 gateway with the following properties:
- Media Termination Point: Checked
- Significant Digits: All
- Calling Party Selection: Originator
- Calling Party Presentation: Allowed
- Display IE Delivery: Checked
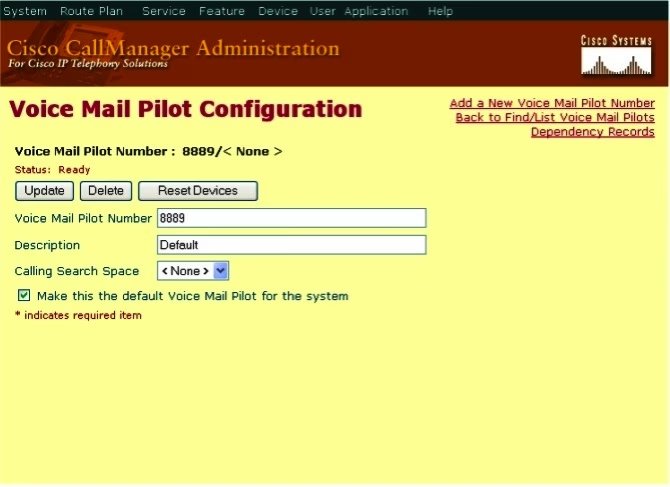
Go to Feature > Voice Mail > Voice Mail Pilot. Open the default and adjust the settings as per the following screenshot.
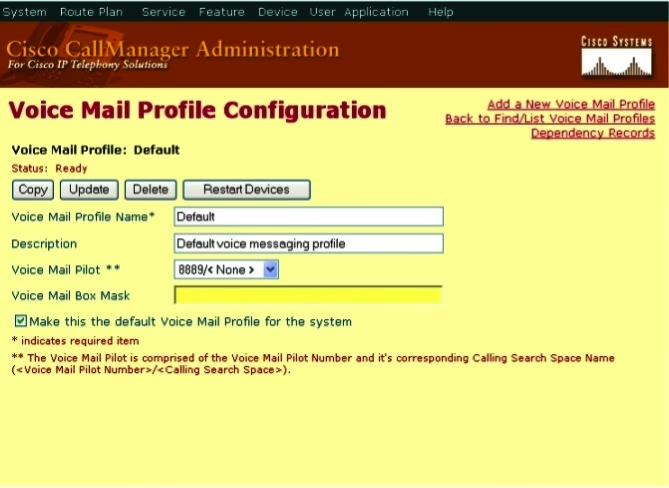
Update, and go to Feature > Voice Mail > Voice Mail Profile. Open the default and adjust the settings as per the following:
Go to Feature > Voice Mail > Message Waiting.
Add two new numbers with the following settings:
We now need to add the 2EXTEN route to get to Asterisk voicemail.
Go to Route Plan > Route Pattern and add a new route with the following settings:
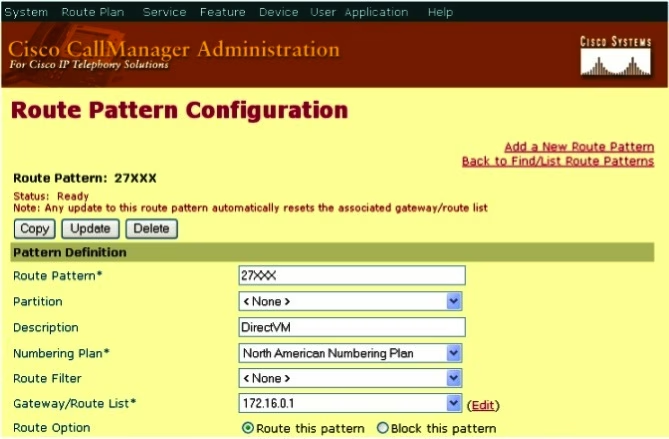
Make sure that the Gateway is the gateway we created earlier. You will need to modify the pattern to suit your extension numbers.
You now need to modify the configuration for your phone(s). I’d advise only setting this up on one phone and then repeating once you are satisfied that everything is working.
Go to Device > Phone. Select the phone that you want and then select the directory number on the left.
Under call forward and pickup settings, enter:
- Forward Busy Destination: 2XXXX (where XXXX is the extension number)
- Forward No Answer Destination: As above
Asterisk Configuration
First you need to create the voicemail notification script. This script activates and deactivates message waiting (MWI).
Create /var/lib/asterisk/scripts if it doesn’t exist and open (or create) vm.sh. Add the following:
if [ $3 -gt 0 ]; then

CALLFILE=$(cat <<-EOF1
Channel: Local/281$2
MaxRetries: 1
# Retry in 2 min
RetryTime: 120
WaitTime: 45

Context: default
Extension: s
Priority: 1

EOF1)

 echo "$CALLFILE" >> "/var/spool/asterisk/outgoing"/$(date +%Y%mNaVI%M%S)-$1

else

CALLFILE=$(cat <<-EOF1
Channel: Local/280$2
MaxRetries: 1
# Retry in 2 min
RetryTime: 120
WaitTime: 45

Context: default
Extension: s
Priority: 1

EOF1)

 echo "$CALLFILE" >> "/var/spool/asterisk/outgoing"/$(date +%Y%mNaVI%M%S)-$1

fi
Chmod the file to 755.
Add the script to voicemail.conf, by setting the following: externnotify=/var/lib/asterisk/scripts/vm.sh
Now, open extensions.conf and add a context that matches your voicemail context (or use an existing one). Add the following:
exten => _2807XXX,1,SetCallerID(${EXTEN:3})
exten => _2807XXX,2,Dial(OH323/[email protected])
exten => _2807XXX,3,Answer
exten => _2807XXX,4,Wait,1
exten => _2807XXX,5,Hangup

exten => _2817XXX,1,SetCallerID(${EXTEN:3})
exten => _2817XXX,2,Dial(OH323/[email protected])
exten => _2817XXX,3,Answer
exten => _2817XXX,4,Wait,1
exten => _2817XXX,5,Hangup
Make sure you replace 192.0.2.1 with your Callmanager IP.
Next we’ll setup the voicemail destination (2EXT). In extensions.conf in the context accessible from Callmanager, add:
exten => _27XXX,1,NoOp
exten => _27XXX,2,MailboxExists(${EXTEN:1}@default)
exten => _27XXX,3,Congestion
exten => _27XXX,103,Voicemail(su${EXTEN:1})
exten => _27XXX,104,Playback(vm-goodbye)
exten => _27XXX,105,Hangup
Make sure you replace @default with the voicemail context and modify the rest accordingly. You will also need to make sure that you have setup extensions 8888 and 8889 (or your equivalent).
With a bit of luck you should have working voicemail.